 CacheGuard-OS
User's Guide - Version UF-2.6.3
Getting Started
CacheGuard-OS is an autonomous Operating System (OS) that turns an x86/x64-based machine (virtual or bare metal) into a network Security and Optimisation appliance. Caution: installing CacheGuard-OS on a machine will format all disks on that machine, permanently deleting all existing data.CacheGuard-OS is built on a Linux kernel and several widely used open-source components, all compiled from source to ensure maximum integrity and security. The combination of these components and proprietary software developed by CacheGuard Technologies forms CacheGuard-OS. Note that CacheGuard does not depend on any specific Linux distribution, as it is itself an appliance-oriented Linux distribution.
The open-source software used by CacheGuard-OS is mainly distributed under the GNU GPL. Open-source programs developed by CacheGuard Technologies are distributed under the CacheGuard Licence, which is a dedicated open-source licence. Please read the Licence Agreement carefully before using the product.
The installation programme provides two installation options: Gateway or Manager. A Gateway system delivers network Security and Optimisation services. If you deploy multiple Gateways, you can manage them individually or centrally using a Manager system. In that case, install CacheGuard-OS as a Manager on a dedicated machine to centrally manage multiple Gateways. Note that only one installation type can be selected per machine - a single system cannot function as both a Gateway and a Manager at the same time.
A configured Gateway can operate in forwarding mode to protect internal users accessing the internet, and in reverse mode to secure and optimise traffic exchanged with web applications. Both modes can be enabled simultaneously on the same Gateway.
Machine Requirements
Gateway Machine Requirements
The required machine resources for a Gateway system mainly depend on the total number of users to be protected (in forwarding mode) or the maximum number of simultaneous users of web applications to be protected (in reverse mode). By “simultaneous users”, we mean active users who consume the appliance’s resources (mainly RAM and CPU). Simultaneous users differ from concurrent users, who may all be connected to protected web applications without necessarily consuming any resources on the CacheGuard appliance. On web application servers, concurrent users typically consume RAM and/or disk space, whereas on CacheGuard, only simultaneous users consume RAM and CPU (number of simultaneous users ≤ number of concurrent users).During installation, the OS is fine-tuned according to the expected number of users to be supported, ensuring an optimal balance between performance and resource consumption. To provide an optimised quality of service, the tuning process assumes that not all users are connected simultaneously — only about 20 percent of them. For example, an appliance installed for 100 users is configured to support 20 simultaneous users while still allowing short bursts of up to 100 simultaneous users for limited periods.
For 100 users (20 simultaneous users), a typical machine configuration is as follows:
- Architecture: x86/x64
- CPU: 4 cores
- RAM: 8 GB
- Disk: 250 GB
- Network: 2 × Ethernet NIC
For higher numbers of users, it is advisable to use a machine with additional RAM, CPU cores, and disk capacity. As a general rule, add one CPU core and 1 GB of RAM (+75 GB of disk space in forwarding mode) for every 10 additional simultaneous users. For instance, an appliance supporting 40 simultaneous users would require six CPU cores, 10 GB of RAM, and approximately 400 GB of disk space in forwarding mode.
On physical hardware, CacheGuard-OS performs more efficiently with multiple lower-capacity disks configured as a RAID array rather than a single high-capacity disk. CacheGuard-OS natively supports software RAID using only about 3% of CPU resources. Supported RAID levels include RAID 0 (striping), RAID 1 (mirroring), RAID 5 (striping with parity), RAID 6 (striping with double parity), and RAID 10 (striping with mirroring).
CacheGuard-OS allows all integrated security and optimisation features to be enabled simultaneously on the same machine. Some features, such as real-time HTTP compression and antivirus, are more CPU-intensive than others, and activating antivirus functionality requires approximately 2 GB of RAM. The configuration guidelines provided above apply when all features are enabled concurrently. Fewer resources may be sufficient if not all features are required.
CacheGuard-OS requires at least two NICs (Network Interface Cards). If your machine has only one NIC, you may use a USB Ethernet adapter as the second interface. To take advantage of link bonding or to use an auxiliary network interface, additional NICs (or USB Ethernet adapters) are required.
CacheGuard-OS can also be installed for a minimal number of users on a compact computer. The minimum configuration to support 10 users in forwarding mode is as follows:
- Architecture: x64
- CPU: 2 cores
- RAM: 4 GB
- Disk: 40 GB
- Network: 2 × Ethernet NIC
Manager Machine Requirements
The required resources for a Manager system mainly depend on the total number of Gateway systems to be managed. To manage up to 10 Gateway systems, a typical configuration is as follows:- Architecture: x86/x64
- CPU: 2 cores
- RAM: 1 GB
- Disk: 25 GB
- Network: 1 × Ethernet NIC
To manage additional Gateways, it is recommended to use a system with increased disk capacity. As a general guideline, add approximately 25 GB of disk space for every 10 additional Gateway systems to be managed.
Machine Compatibility
CacheGuard-OS supports most commonly used x86/x64-based devices available on the market. If your device is not detected during installation, please contact us - we will do our best to integrate the required drivers into the OS to ensure compatibility.OS Installation
The same installation CD-ROM can be used to install the appliance either as a Gateway system or as a Manager system. Simply follow the on-screen instructions during installation to select the desired system type.CD-ROM Drive Installation
To install CacheGuard-OS from a CD-ROM drive, follow these steps:- Download the appropriate x64 or x86 ISO image file.
- Burn the ISO image to a CD-ROM using your preferred disc-burning tool.
- Boot your target appliance from the CD-ROM and follow the installation instructions.
USB Memory Stick Installation
To install CacheGuard-OS from a USB memory stick, follow these steps:- Download the x64 or x86 ISO image file.
- Create a bootable USB stick from the ISO file. You can use UNetbootin or run the following Linux command:
sudo dd if=CacheGuard-OS.iso of=/dev/sdX conv=fdatasync status=progress
Replace CacheGuard-OS.iso with the downloaded ISO file and /dev/sdX with the device path of your USB stick. CAUTION: carefully identify your USB device path to avoid erasing your workstation's disks. - Boot the target appliance from the USB stick and follow the installation process.
- To avoid conflicts with other USB storage devices, plug in the installation USB stick last. This helps the installer distinguish it from other devices.
Network Installation
To install CacheGuard-OS over a network, the target machine must support PXE boot. An installation server is also required, running the following services:- A DHCP server
- A TFTP server
- Copy the cacheguard directory from the installation CD-ROM to the root directory of your TFTP server (usually /srv/tftp on Linux).
- Copy the cacheguard-boot directory from the CD-ROM to the TFTP root.
- Copy the isolinux directory from the CD-ROM into the cacheguard-boot directory on your TFTP server.
- For example, on a Linux system with the CD-ROM mounted at /mnt/cdrom and TFTP root at /srv/tftp, run:
- sudo cp -rf /mnt/cdrom/cacheguard /srv/tftp/
- sudo cp -rf /mnt/cdrom/cacheguard-boot /srv/tftp/
- sudo cp -rf /mnt/cdrom/isolinux /srv/tftp/cacheguard-boot/
- Update your DHCP configuration as follows:
... allow booting; allow bootp; filename "/cacheguard-boot/isolinux/pxelinux.0"; subnet <network-ip-address> netmask <network-mask> { range <first-ip-address> <last-ip-address>; next-server <tftp-ip-address>; } ... - For BIOS-based systems, use /cacheguard-boot/isolinux/pxelinux.0 as the filename. For UEFI systems, use /cacheguard-boot/pxeboot.efi.
- Finally, boot the target machine from its PXE-enabled network interface (preferably the first one).
The OVA & VHD Distribution Forms
The Gateway OVA (Open Virtual Appliance) version uses two network interfaces, which should be connected according to your configuration requirements. The VHD (Virtual Hard Drive) version can be attached to a virtual machine with at least two network interfaces. Typically, the CacheGuard external interface connects to an internet router or DMZ, while the internal interface connects to the LAN.After booting the VM, log in as admin (default password: admin) and follow the setup procedure.
VMware® Notes
For security reasons, VMware Tools are not installed and cannot be installed on a CacheGuard appliance.
Oracle VirtualBox® Note
CacheGuard is fully compatible with Oracle VirtualBox®.
Microsoft Hyper-V® Note
When installing CacheGuard on Microsoft Hyper-V®, ensure that MAC address spoofing is disabled on the virtual machine.Gateway Connection
In a standard configuration, CacheGuard Gateway divides your network into two zones: an external, untrusted zone (connected to the internet) and an internal, trusted LAN zone.CacheGuard uses two logical interfaces: external and internal. Each logical interface must map to at least one physical network interface.
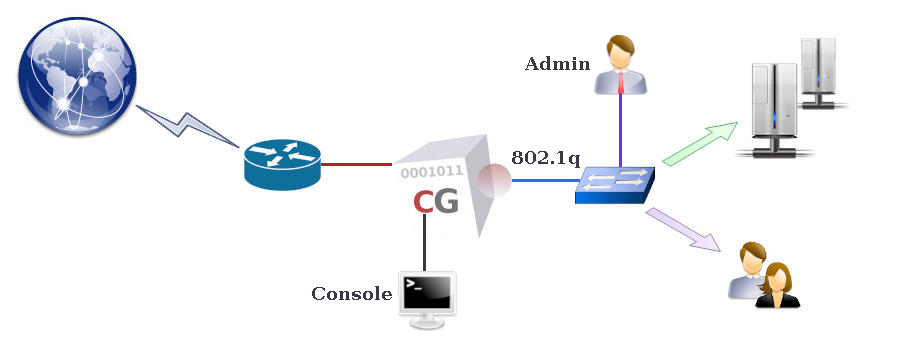
Connect the internal interface to your LAN and the external interface to your WAN (typically your internet router).
Gateway Configuration
First Configuration
To begin, connect to the CacheGuard console interface and log in as the admin user.The console can be accessed via:
- A directly attached monitor and keyboard
- An RS232 serial port (configured as 115200 8N1)
Upon first login, the setup command is automatically launched to guide you through basic network configuration. Alternatively, you can use CLI commands directly:
- ip external 192.168.1.1 255.255.255.0
- ip internal 10.20.0.254 255.255.255.0
- ip route add default 192.168.1.254
- dns add 127.0.0.1
- apply
Basic Configuration
Configuration in CacheGuard-OS is transactional: settings are defined first, then committed using the apply command. This ensures stability and allows pre-validation before activation.The apply command verifies consistency before deployment, taking between 5-180 seconds depending on hardware and operation type. It runs in the background, allowing other commands to be executed (except configuration changes). Progress can be checked using apply report.
Accurate timekeeping is essential, as many services depend on the system clock. To set the time and date:
- clock <YYYY/MM/DD-hh:mm:ss>
- apply
Only trusted administrators can remotely manage the appliance. Use access to define trusted networks. Example:
- access admin add internal 10.20.0.0 255.255.255.0
- apply
To enable SSH and web administration interfaces:
- admin ssh on
- admin wadmin on
- apply
Connect remotely using SSH:
ssh admin@10.20.0.254
Or via the Web GUI at:
https://10.20.0.254:8090
Verify the SSL fingerprint with tls server fingerprint default. For enhanced security, set distinct passwords for console/SSH and web administration using password login.
Features (or "modes") can be enabled or disabled with the mode command. By default, both web (proxy) and transparent modes are enabled. Transparent mode intercepts web traffic (HTTP & HTTPS) without requiring browser configuration, while non-transparent mode requires proxy settings (e.g. 10.20.0.254:8080). Intercepted HTTP traffic can then be logged, cached, compressed, and filtered by URL guarding and the web antivirus, while HTTPS (encrypted traffic) can only be logged and filtered by URL guarding based on the SNI (Server Name Indication) of the HTTPS traffic. The appliance can also handle HTTPS traffic in the same way as HTTP traffic when the SSL Mediation mode is activated.
Enable caching with:
- mode cache on
- apply
Refer to the General Modes section for a summary of available features. To secure web servers, enable reverse mode (mode rweb on) and configure it via rweb. To disable unused features (e.g. forwarding proxy), use mode web off.
For command assistance, use help or help <command> (e.g. help ip). Press <TAB> to autocomplete or list available parameters.