 CacheGuard-OS
User's Guide - Version UF-2.5.2
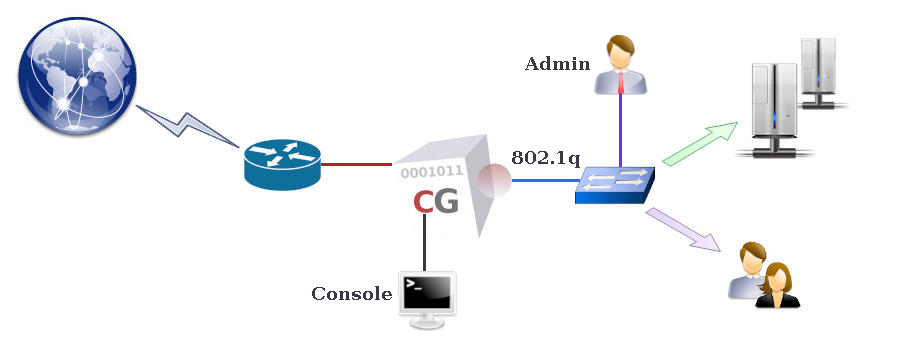
Administration Interfaces
This section describes how to connect to a CacheGuard appliance in order to configure and administrate it. Three configuration and administration interfaces are available in a CacheGuard appliance:- The console port
- The HTTPS interface (Web Administration GUI)
- Secure Shell (SSH)
Console Port
The console port is the main interface of a CacheGuard appliance. It can either be a serial port (male DB9 RS232) or a screen and keyboard directly connected to the appliance. To use the serial port, connect the CacheGuard appliance serial port to your workstation’s serial port using a crossed serial cable. You can then use your preferred terminal emulator (PuTTY, Minicom, Screen, etc.) to connect to the CacheGuard appliance. Serial communication with a CacheGuard appliance should use the following settings: 115200 8N1 (115200 baud rate, 8 data bits, no parity, 1 stop bit).The console port is the most secure and reliable administration interface of a CacheGuard appliance. After installation, the only available administration interface is the console port. To grant remote administration access to an administrator for the first time, you must use the console port (access admin command).
An administrator must be authenticated before connecting to the system. The "admin" user is the main administrator with the highest administration level. Other administrator users with fewer privileges can be added to the system using the admin user command. You must log in as the "admin" user for the first connection to the CacheGuard appliance. The password to use is the one set during installation (the default password for pre-installed CacheGuard appliances is "admin"). Please refer to the Administrator Users section of this documentation for more information on administrator users.
The administration and configuration process via a character interface (console port or SSH) is carried out using the CLI (Command Line Interface). To see the list of all available commands, use the help command without arguments. To obtain help on how to use a specific command, use the help command followed by the command name. If you forget the syntax of a command, the completion feature can help you find the correct syntax. Completion is available by pressing the <TAB> key.
When using a character interface, the administrator has the ability to create mini-programmes using a lightweight "bash" environment (an open-source scripting language). You can use the history command to display a list of previously entered commands. To disconnect from the console port, use the exit command. The connection is also automatically closed if no command is entered for a certain period of time.
Web Administration GUI
For administrators who are not familiar with a CLI (Command Line Interface) or who simply prefer a GUI (Graphical User Interface), a Web Administration GUI is available. To connect to the Web Administration GUI, you need a Web browser. The CacheGuard appliance supports almost all modern Web browsers, including (but not limited to) Firefox, Chrome, Safari, Opera and Edge. Before connecting to a CacheGuard appliance via a Web browser, the Web Administration GUI must be activated on the appliance, and the remote administrator’s IP address must be allowed to connect.To activate the Web Administration GUI on the appliance and allow remote administrators in the network "10.20.0.0 255.255.255.0" to connect to the appliance via its internal network interface, use the following commands:
- admin wadmin on
- access admin add internal 10.20.0.0 255.255.255.0
- apply
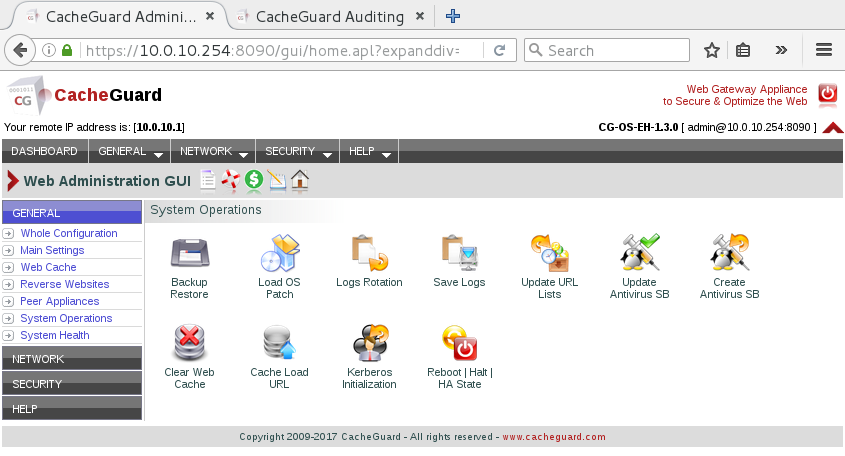
When the running (active) configuration differs from a newly built configuration, a blinking down-arrow button appears in the title bar, inviting you to click it. Clicking that icon redirects you to the Apply New Configuration page, where you can proceed with the apply operation by pressing the SUBMIT button (or the green check icon in the title bar). The Web Administration GUI is not described in detail in the User’s Guide, as its usage is designed to be intuitive enough not to require extensive documentation.
Secure Shell (SSH)
The CacheGuard appliance can also be remotely administrated using an SSH client. When logged in via an SSH client, the administrator can use the CLI to administrate and configure the CacheGuard appliance. To use the SSH administration interface, you should use an SSH client installed on your workstation (for example, the Linux ssh command or the PuTTY application).To use the SSH administration interface, remote administrators must be allowed to access the CacheGuard appliance, and the SSH service must be activated on the appliance. To activate the SSH service and allow remote administrators in the network 10.20.0.0 255.255.255.0 to connect via the internal network interface, use the following commands:
- admin ssh on
- access admin add internal 10.20.0.0 255.255.255.0
- apply
The process of generating SSH keys depends on the remote workstation used. For instance, to generate an SSH key pair (public and private) on a Linux system, you can use the "ssh-keygen" command. To import a public SSH key into a CacheGuard appliance, first copy it to a file server supporting the TFTP, FTP or SFTP protocols, and then load it into your CacheGuard appliance from that file server (which can also be hosted on your workstation). Only trusted file servers are permitted to exchange files with a CacheGuard appliance. To add the file server with the IP address 10.20.0.1 to the list of trusted file servers and allow it to exchange files via the internal network interface, use the following commands:
- access file add internal 10.20.0.1
- apply
- admin ssh key add john
- admin ssh key load john tftp 10.20.0.1 id_rsa.pub
To disconnect an SSH session, use the exit command. The SSH session is also automatically closed if no command is entered for a certain period of time.