 CacheGuard-OS
User's Guide - Version UF-2.5.2
The WAF
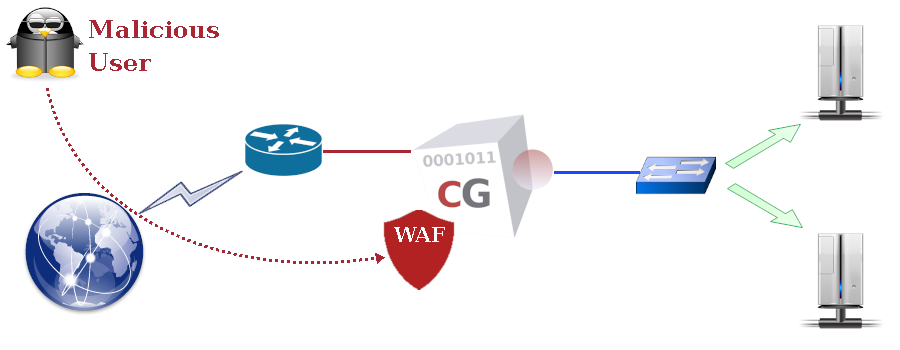
WAF stands for Web Application Firewall and protects Web applications from malicious Web requests intended to compromise or damage applications and/or servers. CacheGuard appliance integrates a WAF that works jointly with the Web Server Cloaking to provide an enhanced level of security for Web servers. The WAF can protect against content attacks such as, but not limited to, XSS (Cross-site Scripting), SQL injection and command injection. Malicious requests are blocked before they reach real Web servers (hosts).
- Generic Filtering: rejects known content attacks; it may be activated globally (for all websites) or per protected website.
- Customised Filtering: allows you to permit or deny Web requests that you design yourself on a per-website basis.
Generic Filters
Generic WAF rules are organised in groups called filters (a filter is composed of WAF rules). Each blocking rule in a generic filter has a score (an integer) and whenever a rule matches in Web traffic its score is added to a global tally. Once a threshold score is reached for a given transaction, the WAF blocks the traffic. Generic filters are provided by OWASP and are classified as follows:- dliis: rules to prevent data leakage from IIS applications.
- dljava: rules to prevent data leakage from Java applications.
- dlphp: rules to prevent data leakage from PHP applications.
- dlsql: rules to prevent data leakage from SQL requests.
- java: rules to protect Java applications.
- lfi: rules to protect against Local File Inclusion attacks.
- nodejs: rules to protect Node.js applications.
- php: rules to protect PHP applications.
- rce: rules to protect against Remote Code Execution attacks.
- rfi: rules to protect against Remote File Inclusion attacks.
- sf: rules to protect against Session Fixation attacks.
- sqli: rules to protect against SQL injection attacks.
- xss: rules to protect against cross-site scripting attacks.
- mode rweb on
- mode waf on
- waf generic sqli on
- apply
- waf rweb generic www.example.com sqli off
- apply
Custom Filters
Custom WAF filters provide precise control over Web requests for a specific website. A custom WAF filter consists of custom WAF rules defined in a textual file that you load into a CacheGuard appliance. A custom WAF rule permits or denies a Web request according to its HTTP method and content. A rule is defined in one, two or three lines depending on the specified HTTP method.A custom WAF rule must begin with the rule keyword followed by an identifier, an action (allow or deny) and an HTTP method (in lowercase). Supported HTTP methods are GET, HEAD and POST. For the GET and POST methods, a second optional line may specify allowed contents (the path and arguments) in the Web request. That second line must begin with the uri keyword and be followed by a PCRE (Perl Compatible Regular Expression) that specifies allowed contents. For the POST method, a third optional line may specify allowed contents in the POST body. That line must begin with the body keyword and be followed by a regular expression specifying allowed data in the body of the POST request.
As an example, the following custom WAF filter includes six rules: the first and second rules allow GET requests on "/" and "/index.html" respectively. The third rule allows POST requests to "/cgi-bin/set-phone.cgi" with a body matching "name=<string>&phone=<numbers>". The final three rules deny any other Web requests.
rule r1 allow get
uri "^/$"

rule r2 allow get
uri "^/index\.html$"

rule r3 allow post
uri "^/cgi-bin/set-phone.cgi$"
body "^name=[[:print:]]*\&phone=[[:digit:]]*$"

rule r4 deny get
rule r5 deny head
rule r6 deny post
To apply this custom WAF filter to the www.example.com website, save it on a trusted file server and then load it into your CacheGuard appliance and associate it with the www.example.com website. Refer to the access file command manual to learn how to declare a trusted file server. The following commands load a custom WAF filter from a file named www.example.com.rules on a TFTP server at 172.18.2.1 and apply it to the website:
- waf rweb custom www.example.com load tftp 172.18.2.1 www.example.com.rules
- apply
Reputation Filters
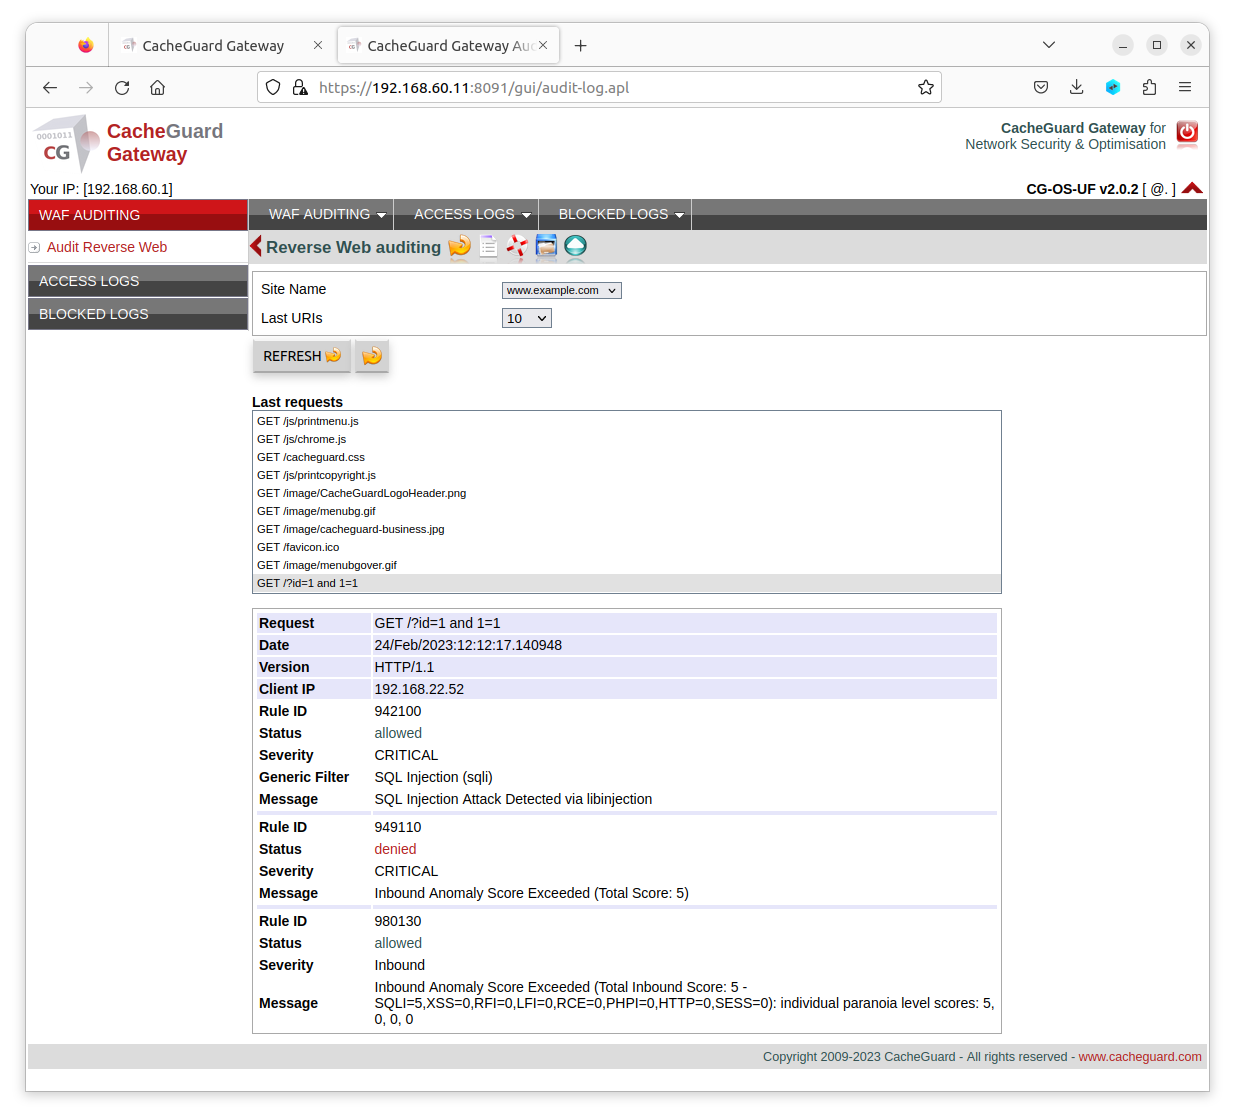
CacheGuard appliance can block Web requests originating from IP addresses with a poor reputation. Reputation-based filtering can block requests from specific countries or from entries listed in an RBL (Real Time Blacklist). See the waf command manual for more information on reputation-based filtering.Website Auditing
A Web-auditing GUI is integrated into the CacheGuard appliance and permits inspection of HTTP requests for a given website. Web auditing helps you determine why a Web request was blocked and which WAF rule (generic or custom) caused the block. To enable Web auditing for the www.example.com website, use the following commands:- admin waudit on
- waf rweb audit www.example.com on
- apply