 CacheGuard-OS
User's Guide - Version UF-2.5.2
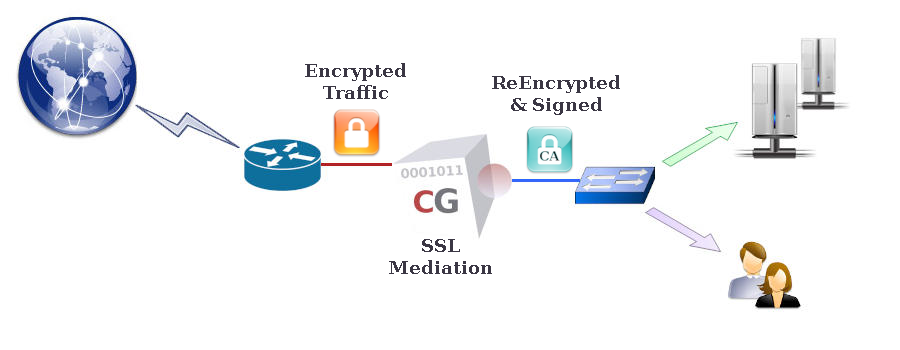
SSL Mediation
CacheGuard appliance can decrypt HTTPS (encrypted) traffic to enable inspection of its content. After inspection, the encrypted Web traffic may be cached or blocked if malware is detected. In this way, bandwidth-intensive content such as video segments can be cached, and malicious content blocked, even when encrypted. Without SSL mediation, such traffic handling would not be possible, as caching or inspecting encrypted data cannot be performed. The purified and/or cached traffic is then re-encrypted by CacheGuard-OS before being sent to Web clients. This feature is referred to as SSL mediation on a CacheGuard appliance.Please note that decrypting and re-encrypting HTTPS traffic can be regarded as a MITM (Man-in-the-Middle) attack. You should therefore ensure that enabling SSL mediation complies with the laws and regulations applicable in your country and/or organisation. It is also important to understand that enabling SSL mediation is entirely at your own responsibility. You are invited to read the CacheGuard-OS Licence Agreement for further information.
- mode transparent on
- mode sslmediate on
- sslmediate transparent on
- apply
The System CA
The CacheGuard CA certificate is referred to as the system CA certificate and is accessible at http://<cacheguard-internal-ip>/, where <cacheguard-internal-ip> represents the internal IP address of your CacheGuard appliance. A default system CA certificate is automatically generated the first time you start your CacheGuard appliance. It is recommended that you regenerate this CA certificate or import your own CA certificate and configure it as the system CA. You can use the following commands to generate a system CA certificate and its associated private RSA key:- tls ca system generate
- apply
- password file add sftp 172.18.2.1 john
- tls ca system load certificate sftp 172.18.2.1 cg-ca.certificate
- tls ca system load key sftp 172.18.2.1 cg-ca.key
- apply
Exception Lists
To prevent MITM attacks, some HTTPS websites use a technique known as SSL pinning. SSL pinning embeds the HTTPS certificate directly into the Web application, thereby preventing any MITM actions — and consequently preventing SSL mediation.Fortunately, CacheGuard appliance can be configured to bypass SSL mediation for certain predefined domain names (deny policy) or to operate exclusively on a predefined list of domain names (allow policy). You can create exceptions by directly specifying domain names (the quick method) or by using URL lists. To manage URL lists, refer to the urllist command. For example, to enable SSL mediation for the example.com domain name only, you may use the following commands:
- sslmediate policy allow
- sslmediate exception urllist raz
- sslmediate exception domainname raz
- sslmediate exception domainname add example.com
- apply